第一个Unity Shader

第一个Unity Shader

本文为参照这篇文章所做练习之笔记。由于笔者已经看过一遍计算机图形学急出,所以不再赘述相关内容。

创建Shader

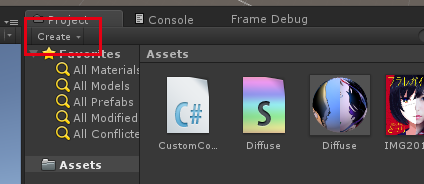
点击create,选择shader,创建一个Standard Surface Shader。创建之后改名为Diffuse。

shader代码

直接贴代码:

1
2
3
4
5
6
7
8
9
10
11
12
13
14
15
16
17
18
19
20
21
22
23
24
25
26
27
28
29
30
31
32
33
34
35
36
37
38
39
40
41
42
43
44
45
46
47
48
49
50
51
52
53
54
55
56
57
58
59
60
61
62
63
64
Shader "Custom/NewSurfaceShader" {
Properties {
// 参数名 ("显示在外界的名字", 类型) = 默认值
_Color ("Color", Color) = (1,1,1,1)
_MainTex ("Albedo (RGB)", 2D) = "white" {}
_Glossiness ("Smoothness", Range(0,1)) = 0.5
_Metallic ("Metallic", Range(0,1)) = 0.0
_Text ("manjack", Color) = (1, 1, 1, 1)
}
SubShader {
// 决定什么时候调用这个着色器,这里是不透明的时候
Tags { "RenderType"="Opaque" }
// Level Of Detail,200是diffuse
LOD 200

CGPROGRAM
// Physically based Standard lighting model, and enable shadows on all light types
// #pragma surface表示是表面着色器 surf为函数名 Lambert是光照模型 最后一个是option
#pragma surface surf Lambert fullforwardshadows

// Use shader model 3.0 target, to get nicer looking lighting
#pragma target 3.0

// 在CG程序中再次声明,要与最前面的名字一致
sampler2D _MainTex;

struct Input {
float2 uv_MainTex;
};

half _Glossiness;
half _Metallic;
fixed4 _Color;

// #pragma instancing_options assumeuniformscaling
UNITY_INSTANCING_CBUFFER_START(Props)
// put more per-instance properties here
UNITY_INSTANCING_CBUFFER_END

// 输入与输出参数没办法改动,只能改函数体,inout说明是个引用
// 但是Input结构体我们是可以定义的
/*
struct SurfaceOutput {
half3 Albedo; //像素的颜色 反照率
half3 Normal; //像素的法向值
half3 Emission; //像素的发散颜色
half Specular; //像素的镜面高光
half Gloss; //像素的发光强度
half Alpha; //像素的透明度
};
*/

void surf (Input IN, inout SurfaceOutput o) {
// Albedo comes from a texture tinted by color
fixed4 c = tex2D (_MainTex, IN.uv_MainTex) * _Color;
c.r = c.r * 1.2;
o.Albedo = c.rgb;
// Metallic and smoothness come from slider variables
o.Alpha = c.a;
}
ENDCG
}
FallBack "Diffuse"
}

根据不同的光照模型的不同,函数的输出类型是不同的。如果光照模型是Standard,那么输出的类型就是StandardSurfaceOutput。

应用到material

确保shader没有语法错误之后,新建一个材质,更改为刚才新建的shader,然后换上纹理。

最后把这个材质拖到3d物体上就能看到效果了。

使用分离的shader而非Surface

1
2
3
4
5
6
7
8
9
10
11
12
13
14
15
16
17
18
19
20
21
22
23
24
25
26
27
28
29
30
31
32
33
34
35
36
37
38
39
40
41
42
43
44
45
Shader "Custom/DiffuseVertFrag" {
Properties {
// 参数名 ("显示在外界的名字", 类型) = 默认值
_MainTex ("Albedo (RGB)", 2D) = "white" {}
}
SubShader {
// 决定什么时候调用这个着色器,这里是不透明的时候
Tags { "RenderType"="Opaque" }
// Level Of Detail,200是diffuse
LOD 100

Pass{
CGPROGRAM
#pragma vertex vert
#pragma fragment frag

// 在CG程序中再次声明,要与最前面的名字一致
sampler2D _MainTex;

struct vertInput {
float4 pos: POSITION;
float2 uv: TEXCOORD0;
};

struct vertOutput {
float4 pos: SV_POSITION;
float2 uv: TEXCOORD0;
};

vertOutput vert(vertInput input) {
vertOutput o;
o.pos = UnityObjectToClipPos(input.pos);
o.uv = input.uv;
return o;
}

fixed4 frag(vertOutput i) : COLOR {
fixed4 col = tex2D(_MainTex, i.uv);
return col;
}
ENDCG
}
}
FallBack "Diffuse"
}

和SurfaceShader的区别是一定要用pass包起来,而且要定义两个pragma来标注两个函数名。输出和输入的结构体一样需要自己定义,输入来源要写unity自带的关键字(宏?)。

Lambert带纹理的shader

代码参考github

1
2
3
4
5
6
7
8
9
10
11
12
13
14
15
16
17
18
19
20
21
22
23
24
25
26
27
28
29
30
31
32
33
34
35
36
37
38
39
40
41
42
43
44
45
46
47
48
49
50
51
52
53
54
55
56
57
58
59
60
61
62
63
64
65
66
67
68
69
// Upgrade NOTE: replaced 'mul(UNITY_MATRIX_MVP,*)' with 'UnityObjectToClipPos(*)'

// Upgrade NOTE: replaced '_World2Object' with 'unity_WorldToObject'

// Upgrade NOTE: replaced '_World2Object' with 'unity_WorldToObject'

Shader "Custom/DiffuseVFLambert" {
Properties {
// 参数名 ("显示在外界的名字", 类型) = 默认值
_MainTex ("Albedo (RGB)", 2D) = "white" {}
// _LightColor0 ("LightColor", COLOR) = (1,1,1,1)
}
SubShader {
// 决定什么时候调用这个着色器,这里是不透明的时候
Tags {
"RenderType"="Opaque"
"LightMode" = "ForwardBase"
}
// Level Of Detail,200是diffuse
LOD 100

Pass{
CGPROGRAM
#pragma vertex vert
#pragma fragment frag

// #include "Lighting.cginc"

// 在CG程序中再次声明,要与最前面的名字一致
sampler2D _MainTex;

uniform float4 _LightColor0;

struct vertInput {
float4 pos: POSITION;
float2 uv: TEXCOORD0;
float3 normal: NORMAL;
};

struct vertOutput {
float4 pos: SV_POSITION;
float2 uv: TEXCOORD0;
float4 color: COLOR;
};

vertOutput vert(vertInput input) {
vertOutput o;

// 把法向量转换到世界坐标
// unity_WorldToObject是个内建的uniform
float3 normalDirection = normalize(mul(float4(input.normal, 0.0), unity_WorldToObject).xyz);
// 直接拿到世界坐标下的光向量
float3 lightDirection = normalize(_WorldSpaceLightPos0.xyz);
float3 diffuseReflction = _LightColor0.xyz * max(0.0, dot(normalDirection, lightDirection));
o.color = float4(diffuseReflction, 1.0);
o.pos = UnityObjectToClipPos(input.pos);
o.uv = input.uv;
return o;
}

fixed4 frag(vertOutput i) : COLOR {
fixed4 color = i.color * tex2D(_MainTex, i.uv);
return color;
}
ENDCG
}
}
FallBack "Diffuse"
}

注意内建变量

在顶点着色器中,首先要获得世界坐标下的法向量和光照向量。

转换法向量的方法是把(物体坐标下的)法向量拿去乘以一个转换矩阵(一个内建矩阵 unity_WorldToObject)。
光照向量直接拿unity提供的世界坐标下的光照向量就行了,不过我们只要它的xyz,拿到之后重新normalize一下。
于是漫反射亮度就是用光的颜色去乘以法向量与光照向量的点积了,光的颜色同样是个内建变量_LightColor0

至于变换顶点坐标,本来要用老的形式mul(UNITY_MATRIX_MVP, input.pos)的,因为封装了方法,所以直接用封装后的方法UnityObjectToClipPos(input.pos)

接下来就是到片元着色器里,把光照强度拿去乘以纹理,得到最终的颜色。

Buy Me A Coffee / 捐一杯咖啡的钱
分享这篇文章~
0%
//